3D Eye Anatomy

How does the human eye work?

Stage 1: Light enters the front parts of the eye

Reflecting off objects in the world around us, rays of bright light continuously enter our eyes. Passing through the sclera (the white outer layer of the eyeball) and cornea (the transparent outermost layer, which covers each part of the eye), these rays are then transmitted into visuals that we can see.

These light waves are first refracted (bent) in such a way by the cornea upon passing through the round hole within the pupil (a black hole in the centre of the eye). Opening and closing like a camera shutter, the iris (a coloured, ring-shaped membrane behind the cornea) enlargers or decreases the size of the pupil to adjust the amount of light that passes through.

Stage 2: The lens adjusts focus

Continuing through the crystalline lens (a flexible and transparent structure positioned in the anterior portion of the eye), which acts like a camera lens, the light rays are refracted further and focused on the retina. This thin layer of tissue is like that of a film in a camera, and lines the back of the eye on the inside, near the optic nerve (a cable of fibre nerves that carry impulses from the retina to the brain).

Supplied with blood from a network of blood vessels and made up of millions of light-sensing nerve cells, your retina initially receives the light rays, after they have passed through the vitreous humour (a dense jelly-like substance that fills the globe of the eye) the wrong way round. These distinctively-shaped photoreceptor nerve cells forming a part of the retina are known as cones and rods.

Stage 3: Your brain correctly interprets the image

The cone cells are set in the centre of the retina, within the macula lutea or fovea - a section of the retina that's responsible for your central vision or visual acuity. Appearing as a yellow oval spot at the back of the eye, this area perceives high-resolution colours and fine details.

Found outside the macula and extending to the outer edge of the retina, the rod cells facilitate peripheral (side) vision. In low lighting conditions or at night, the rods help you to detect motion. Working together, the two different types of cells convert the light rays into electrical signals that pass through the optic nerve, which finally sends these electrical impulses to the brain, producing the image the correct way up.

People with vision problems, such as myopia (nearsightedness), hyperopia (farsightedness) or astigmatism, experience these refractive errors as a result of the image being incorrectly focused on the retina.

Anatomy of the eye animation

Sponsored by Vision Direct- please click image below

Lens experiment

We can use everyday objects such as a magnifying glass to demonstrate how our eye works and why we are consequently seeing upside down.

Stretch your hand while holding a magnifying glass. If you look through it, the image you will see will be upside down.

Also, you can use a drinking glass. Take a glass, some paper strips and colouring pens. Draw a couple of arrows (preferably different colours), one left and one right. Place the arrows behind the glass and note which way the arrows are facing. Now fill the glass with water. Which way are the arrows pointing to now? Can you experiment with them pointing up and down now?

What is a blind spot in the eye?

Each of our eyes has a tiny functional blind spot about the size of a pinhead. In this tiny area, where the optic nerve passes through the surface of the retina, there are no photoreceptors. Since there are no photoreceptor cells detecting light, it creates a blind spot. Without photoreceptor cells, the eye cannot send any messages about the image to the brain. Our brains typically fill in any information we need based on the images surrounding our blind spot, so we don’t usually notice it.

Side-view mirrors on cars are a good example of how we compensate for our blind spots. Many times, cars travelling next to us fall in our blind spot, and the side-view mirrors give us a different angle to view the same area. They allow us to “see” in our blind spot.


Find your blind spot

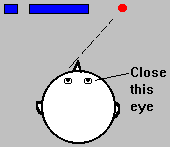
To find your blind spot, look at the image below or draw it on a piece of paper:


Close your right eye. Hold the image (or place your head from the computer monitor) about 50 cm away. With your left eye, look at the +. Slowly bring the image (or move your head) closer while looking at the +. At a certain distance, the dot will disappear from sight...this is when the dot falls on the blind spot of your retina. Reverse the process. Close your left eye and look at the dot with your right eye. Move the image slowly closer to you and the + should disappear.


Here are some another images to show your blind spot.

For this image, close your right eye. With your left eye, look at the red circle. Slowly move your head closer to the image. At a certain distance, the blue line will not look broken!! This is because your brain is "filling in" the missing information.


In the next two images, again close your right eye. With your left eye, look at the numbers on the right side, starting with the number "1." You should be able to see the "sad face" (top image) or the gap in the blue line (bottom image) in your peripheral vision. Keep your head still, and with your left eye, look at the other numbers. The sad face should disappear when you get to "4" and reappear at about "7." Similarly, the blue line will appear complete between "4" and "7."

Here is another image to show your blind spot. Close your right eye. With your left eye, look at the +. You should see the red dot in your peripheral vision. Keep looking at the + with your left eye. The red dot will move from the left to the right and disappear and reappear as the dot moves into and out of your blind spot.


Make your own blind spot bookmarks

Print and cut out these 3 images and use them as bookmarks. You could laminate the bookmarks to protect them. If you do not have a laminator, you can sandwich the bookmarks between two pieces of clear strapping tape. Trim the edges of the tape, and you will have a strong bookmark.

The top and bottom bookmarks demonstrate the blind spot. Do you see a triangle in the middle bookmark? Is it really there? 

X-Ray vision experiment

Do you have "X-Ray Vision?" You may be able to see through your own hand with this simple illusion. Roll up a piece of notebook paper into a tube. The diameter of the tube should be about 2 cm. Hold up your left hand in front of you. Hold the tube right next to the bottom of your left "pointer" finger in between your thumb (see figure below).

Look through the tube with your right eye but keep your left eye open too. What you should see is a hole in your left hand!! Why? Because your brain is getting two different images...one of the hole in the paper and one of your left hand.


After-images

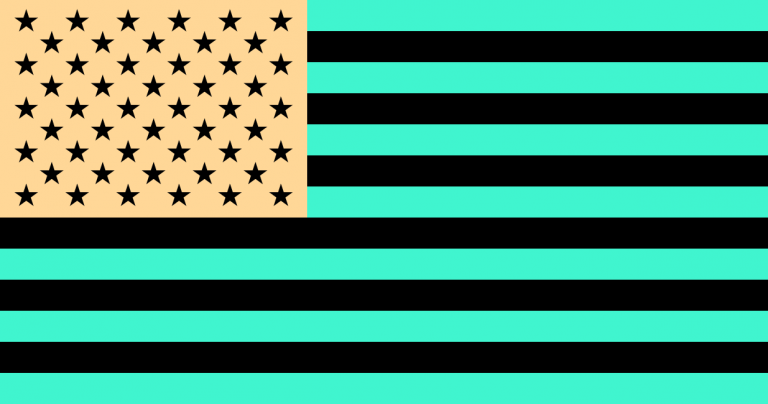
If you have ever stared for a long time at a fixed point and then suddenly shifted your gaze somewhere else, then you probably noticed a brief after-image effect in which you continued to see the original picture.

There are two major types of after-images: positive after-images and negative after-images.

In some instances, the colours of the original stimulus are retained. This is known as a positive after-image. Essentially, the after-image looks the same as the original image. You can experience a positive after-image yourself by staring at a very brightly lit scene for a period of time and then closing your eyes. For the briefest of moments, you will continue to "see" the original scene in the same colours and brightness. The exact mechanisms behind positive after-images are not well understood, although researchers believe that the phenomenon might be related to retinal delay, meaning once the cells have been excited in retina it takes some time for that response to end. 

In other cases, the colours may be reversed. This is known as a negative after-image. For example, if you stare for a long time at a red image, you will see a green after-image. The appearance of negative after-images can be explained by the opponent-process theory of colour vision.

According to the opponent-process theory of colour vision, staring at the original red and blue image involved using the red and blue parts of the opponent-process cells. After that minute of extended staring, the ability of these cells to fire action potential was exhausted. In other words, you briefly 'wore out' those red-blue cells. When you shifted your focus to a blank, white screen, those cells were still unable to fire and only the green/yellow opponent-process cells continued to fire action potentials. Since the light reflecting off your screen could only activate those green and yellow cells, you experienced a brief after-image in green and yellow rather than in red and blue.


After-image samples

Keep your gaze on the black dot in the central pink inducing circle for around 30 seconds to a minute. Then hover your cursor over the image to allow you to transfer your gaze to the black dot in the centre of the plain white inducing patch.

You should experience an image similar to the pink inducing circles in the region of the white inducing patch. It should exhibit inverted colours, appearing yellowish-green.

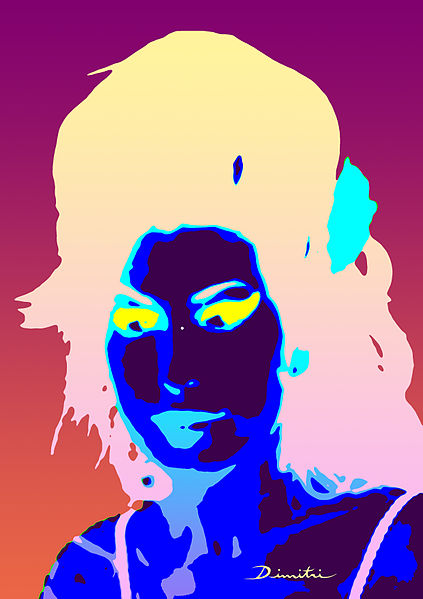
Negative after-images can be relatively complex as the images below!

Stare at the bottom right corner of the yellow rectangle for 30 seconds to one minute and then look at a white surface, such as a blank screen, a white wall, or a piece of paper.

Blinking a couple of times while looking at the white surface may help you to experience the after-image.

This time stare at the white dot on the middle of the nose for 30 seconds to one minute and then look at a white surface, such as a blank screen, a white wall, or a piece of paper.

Blinking a couple of times while looking at the white surface may help you to experience the after-image.

In this sample stare at the 4 black dots on the middle of the nose for 30 seconds to one minute and then look at a white surface, such as a blank screen, a white wall, or a piece of paper.

Blinking a couple of times while looking at the white surface may help you to experience the after-image.

Test your awareness!

Make your camera obscura

Camera obscura is Latin for "dark chamber." It is the name given to a simple device used to produce images that would lead to the invention of photography. The English word for today's photographic devices is merely a shortening of this name to "camera".

At its most basic, the camera obscura is a simple box (which may be room-sized) with a small hole in one side. Light from only one part of a scene will pass through the hole and strike a specific part of the back wall. As the pinhole is made smaller, the image gets sharper, but the light-sensitivity decreases. With this simple apparatus, the image is always upside-down.


By using mirrors, as in the 18th century overhead version, it is also possible to project a "right-side-up" image.